How To Install Custom Blinds: A DIY Guide
The boxes are on the floor, the hardware bags are rattling around, and now the doubt kicks in. You ordered custom blinds because you wanted a clean, fitted look. Now you're staring at brackets, screws, and a drill, wondering if one bad measurement is about to ruin the whole job.
Good news. Most blind installs are very manageable if you slow down and make the right calls early, especially around measurement, mount style, and crooked old window frames. The trick isn't brute force. It's knowing when the window opening is giving you a false sense of “easy.”
If you're trying to figure out how to install custom blinds without ending up with a crooked headrail, rubbing sides, or a blind that won't raise smoothly, this guide walks through the parts that matter most.
Table of Contents
- Your New Blinds Have Arrived Now What
- Prep Work The Pros Never Skip
- Inside Mount vs Outside Mount Whats Best For Your Window
- Mounting Your Blinds For a Secure Fit
- Setting Up Motorized and Smart Blinds
- Troubleshooting Common Installation Hiccups
- When to Call a Certified Installer
Your New Blinds Have Arrived Now What
Start by resisting the urge to install the first blind you grab. Set every box in the room where it belongs, match each blind to its window, and check the labels before you open the hardware packs. That simple step saves a lot of grief later.
Custom blinds usually arrive looking more intimidating than they are. Most of the job comes down to getting the layout right, mounting the brackets securely, and checking that the blind operates properly once it's clipped or locked in place.
The biggest mistake homeowners make at this stage is assuming custom means foolproof. It doesn't. Custom means the product was built to a set of measurements, so your install still has to respect the actual window in front of you, not the one you pictured when you ordered.
Practical rule: Don't drill anything until you've confirmed the blind matches the opening and the mount style you planned still makes sense.
This is also the moment to check for surprises. Look at the frame for trim that sticks out, cranks, locks, sensors, or old casing that isn't square. If you're refreshing a room and want ideas on how the finished space can come together, this guide on designing your dream space with custom blinds and shades is worth a look.
A good install feels calm. Lay out the brackets, screws, valance clips, and any remote or charger if you bought motorized blinds. Once everything is identified and you know which window gets what, the job starts to feel a lot less mysterious.
Prep Work The Pros Never Skip
A lot of blind installs go sideways before the first screw goes in. The blind is fine. The window is the problem. In older homes, especially, the opening can be out of square, the trim can kick out farther than expected, or a handle can steal the clearance you thought you had.
That is why pros slow down here.
Open every box and dry-fit the hardware
Match each blind to its window, then confirm the bracket style, control side, valance clips, and screws before you mark anything. Hardware for different mount types can look close enough to fool you until you are halfway through the install.
Hold the headrail in place and check the actual opening, not the number written on the order. If you were planning a recessed look, compare the blind to the available depth and look for anything that projects into the path of the blind. For homeowners weighing that recessed finish, these inside mount blind options show the look well.
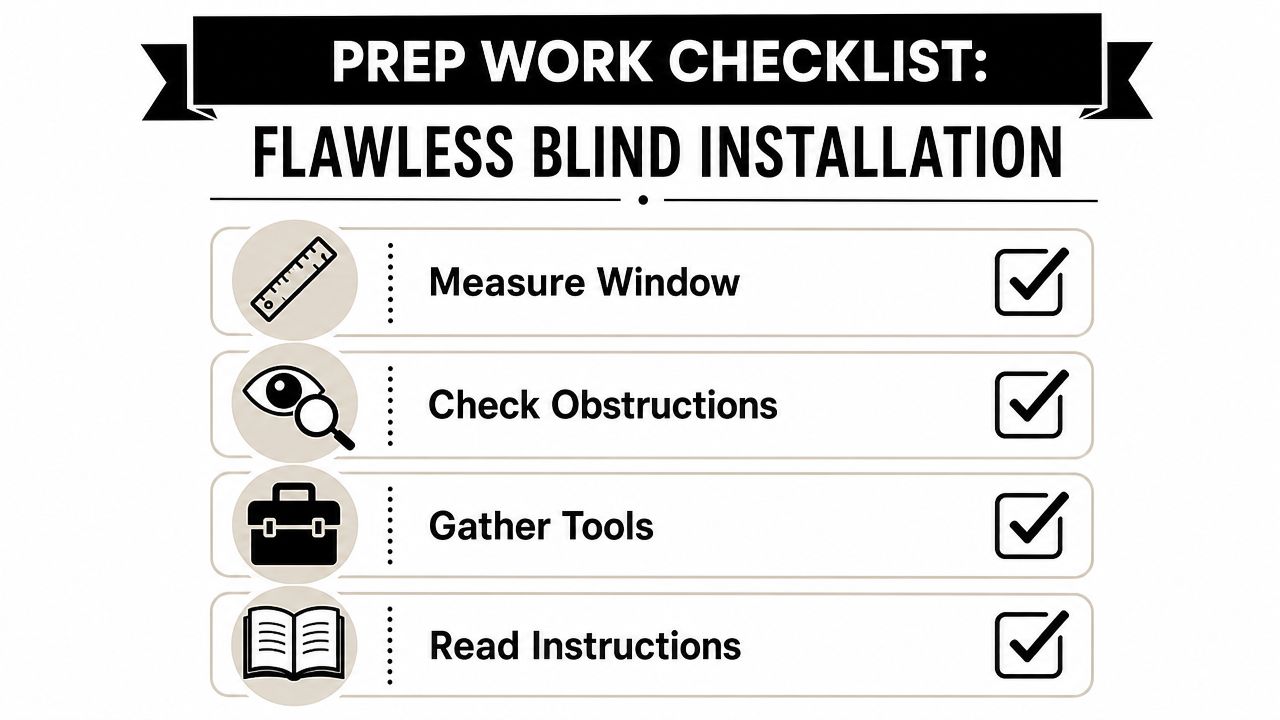
A quick dry-fit catches the problems the box label will never tell you. Tight returns, proud casing, alarm sensors, tilt latches, and crank handles are common ones.
The tools that matter
Good prep does not require a shop full of gear. It requires a few tools that keep the install straight, clean, and secure.
- Metal tape measure: Better for accurate inside measurements than a soft household tape.
- Level: Helps you spot bracket drift and uneven casing before the blind makes it obvious.
- Pencil: Light marks are easier to clean up than pen or marker.
- Drill with the right bit: Pilot holes should match the screw size and the material you are drilling into.
- Manual screwdriver: Useful for final tightening so you do not strip smaller screws.
- Stable step stool or ladder: You work cleaner when you are not stretching.
I see homeowners skip the level because the window "looks straight." Many are not. A blind can be manufactured perfectly and still look crooked if you trusted a wavy piece of trim.
Measure the opening like an installer
For inside mounts, measure width at the top, middle, and bottom. Measure height on the left, centre, and right. Write every number down at the window you took it from.
The smallest width usually tells you what can physically fit. The longest height tells you how much drop you need. Manufacturer instructions cover the basic method, but the judgment call is what matters. If the width changes enough across the opening, or one side is noticeably tighter, an inside mount can turn from clean-looking to fussy fast.
A blind does not care what the builder called the window size. It has to clear the narrowest point and operate without rubbing.
If one corner is tight, check it with the headrail in hand before you commit to bracket marks. Sometimes a small discrepancy is harmless. Sometimes it means the blind will scrape the frame every time you raise it. That is the kind of issue worth catching now, while changing the mount style is still easy.
A blind that is a little too wide does not improve after installation. It binds, scuffs the frame, and never feels right.
Finish prep by checking for obstructions at bracket height and at full drop. Handles, locks, cranks, trim returns, and security sensors can all interfere with the headrail or bottom rail. Catching that now is what makes the finished install look professional instead of improvised.
Inside Mount vs Outside Mount Whats Best For Your Window
This is the first real judgment call. Inside mount gives you a custom-fitted, built-in look. Outside mount gives you more flexibility when the opening isn't friendly.
A lot of homeowners assume inside mount is the better option because it looks more custom. Sometimes it is. Sometimes it's the reason the install turns into a headache.
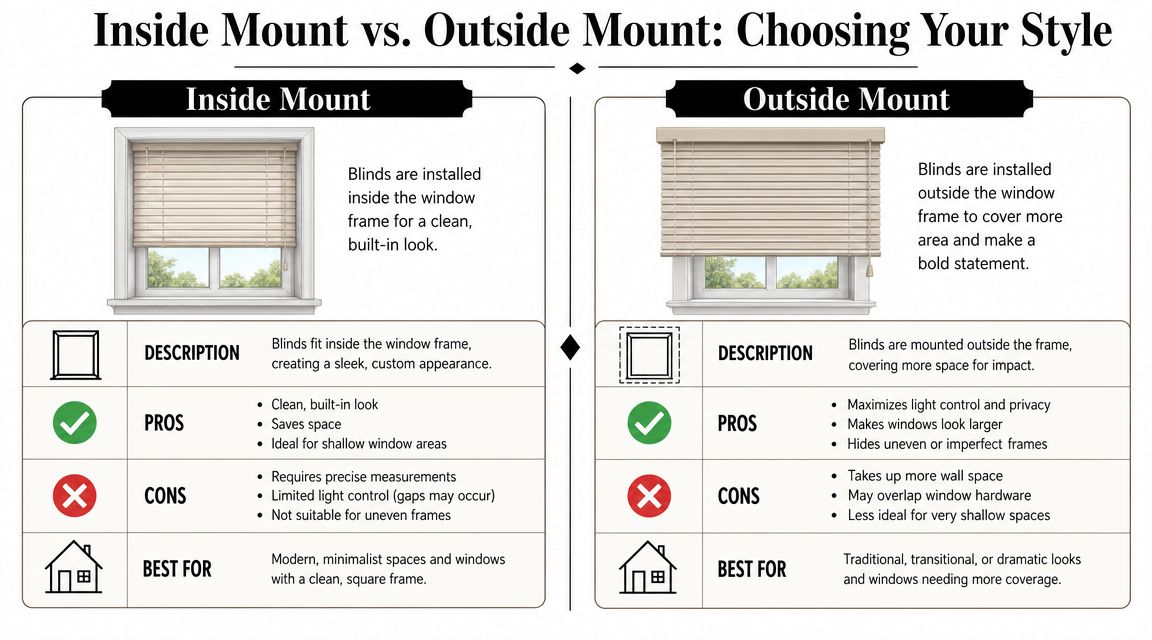
When inside mount works best
Inside mount sits within the window opening. It's the right call when the frame is reasonably square, the recess has enough depth, and you want to show off the trim.
For this style, the most valuable technical step is measuring the opening at three points for both width and height, using the smallest width and longest height, checking each bracket position with a level, and drilling pilot holes with a bit slightly smaller than the screws, as outlined in this inside-mount blind installation guidance from Home Depot.
If you like the cleaner recessed look, this page on inside mount blinds shows the style well.
When outside mount is the better call
Outside mount fastens to the trim, wall, or area above the frame. This is often the smarter choice when the opening is shallow, visibly out of square, or has obstructions that would crowd the blind inside the recess.
It also helps when you want better coverage around the edges. If the frame is ugly, uneven, or patched from old hardware, outside mount hides a lot of sins.
If the opening makes you compromise three things at once, fit, function, and appearance, stop forcing an inside mount.
Inside Mount vs. Outside Mount Decision Guide
| Consideration | Inside Mount | Outside Mount |
|---|---|---|
| Appearance | Built-in, trim stays visible | More coverage, trim can be hidden |
| Fit tolerance | Less forgiving if the frame is uneven | More forgiving on older or wonky openings |
| Light gaps | Usually more side light | Can reduce side light more effectively |
| Obstructions | Cranks and handles can be a problem | Easier to work around obstacles |
| Best use | Square, deep, clean-looking recess | Shallow, crooked, damaged, or awkward frames |
If you're torn, ask a simple question. Do you want the blind tucked neatly inside the frame, or do you want the easiest path to a smooth, professional result? Those aren't always the same answer.
Mounting Your Blinds For a Secure Fit
This is the stage where a clean plan meets a real window. On newer homes, brackets usually land where the instructions expect. On older openings, one side may be tighter, the top may dip, or the trim may not give you solid material where you need it. A secure fit comes from reading the opening before you drive the first screw.
Start with the brackets.
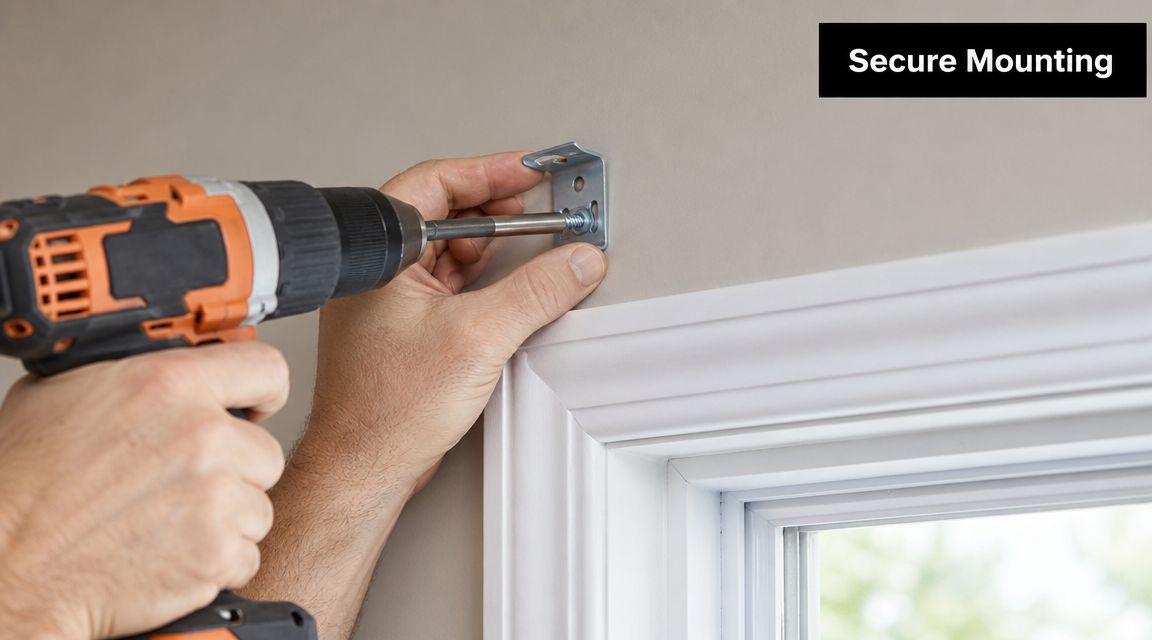
Mark bracket locations carefully
Dry-fit the headrail or bracket set first if the product allows it. That quick check catches a lot. You can spot a handle that will interfere, a recess that pinches at the back, or a frame that looks square from the room but is clearly off once a level goes up.
For inside mounts, set the brackets high and far enough forward that the blind clears the glass and any stops or trim details. Do not assume both sides should match by tape measure alone. In an out-of-square opening, matching the front sightline often matters more than matching the exact depth on each side. That is one of those judgment calls the box instructions rarely explain.
Mark screw holes with a sharp pencil, then hold a level across both bracket positions. If the window frame is crooked, level the blind, not the frame. People notice a blind that slopes. They rarely notice that the trim is the problem.
Drill pilot holes and fasten brackets
Pilot holes keep screws from wandering and help you avoid splitting dry wood trim. They also make it easier to pull the bracket in tight without twisting it out of position.
Drive the screws until the bracket is firm and flat. Stop when it is snug. Overdriving can bend thinner brackets, strip the hole, or pull one side slightly out of line. If the screw bites poorly because the trim is old or soft, move the bracket to a better spot if the product allows it, or use the proper anchor for the surface. A loose bracket never improves with time.
Check these points before the headrail goes up:
- Bracket faces match: Both should sit at the same angle and depth.
- No movement: Press each bracket by hand. Any wobble now will show up in daily use.
- Level is confirmed: Recheck after tightening screws.
- Clearance is realistic: Leave enough side room for the blind to operate without rubbing.
Install the headrail and test movement
Set the headrail into the brackets exactly as your blind style requires. Some clip in from the front. Others hook into the back first and roll into place. If it takes too much force, stop and check bracket alignment before you muscle it in.
Leave a small side clearance so the blind can move without scraping. That matters even more on older windows where the opening narrows from top to bottom. A blind can look centered and still bind because one bracket sits slightly deeper or one jamb bows inward.
Test it several times. Raise it, lower it, tilt it, and listen. A smooth blind should not drag, click, or shift sideways while it runs. If it does, take it back down and correct the bracket position now. Waiting usually turns a small adjustment into visible wear on the headrail, fabric, or slats.
For a broader look at how different products mount and operate, this guide to home blinds and shades can help you compare what you're working with.
Here's a useful walk-through if you want to see the process in motion:
A few blind-specific notes
Different products ask for different tolerances, even when the brackets look similar.
- Roller shades: Confirm the control side before fastening anything. Reversing it after the brackets are in is annoying and sometimes impossible without patching holes.
- Zebra blinds: Keep the headrail level. Even a slight tilt makes the fabric bands look uneven when they pass each other.
- Horizontal blinds: Test lift and tilt before installing the valance. It is easier to correct a small alignment issue while the hardware is still exposed.
- Motorized units: Leave access to the charging port or battery wand. A neat install that blocks service access is not a good install.
Smooth operation is the standard. If the blind rubs, racks to one side, or needs a push to get started, the fit still needs work.
Setting Up Motorized and Smart Blinds
Motorized blinds scare people more than they should. The mounting side is usually familiar. The extra work comes after the blind is hanging.
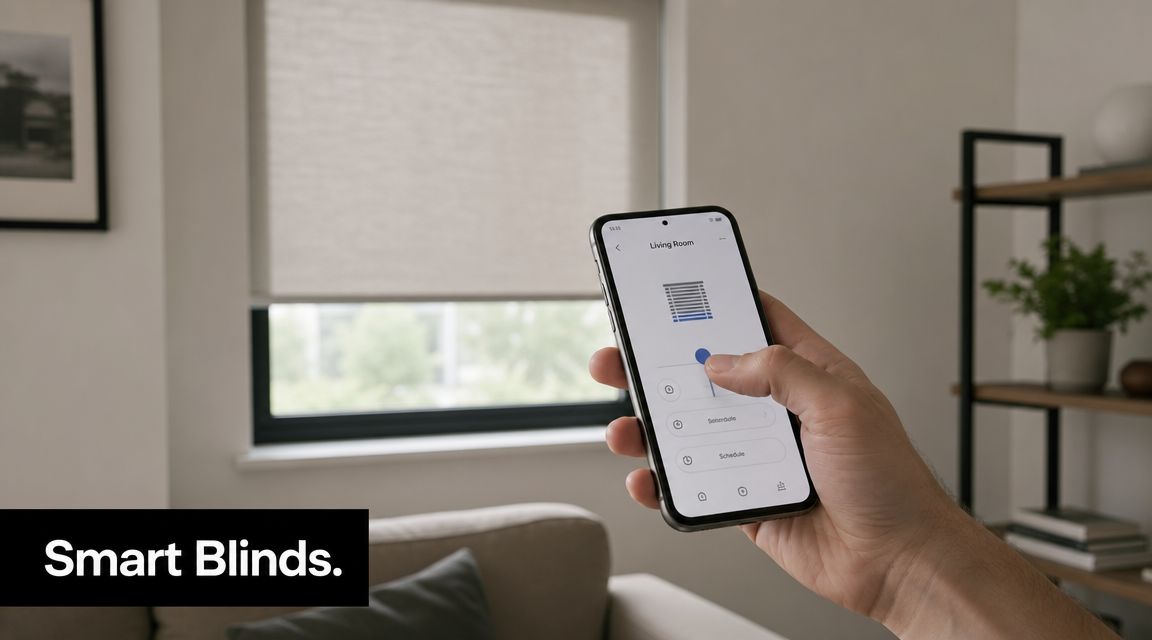
Start with the physical install
Before you pair anything, make sure the shade is mounted correctly and moves freely in the brackets. If the blind is skewed or rubbing, no amount of app setup will make it behave properly.
Charge the motor or install the battery wand first if your model requires it. Keep the remote and instruction sheet beside you instead of trying to remember the button sequence from the box.
For a broader look at different blind and shade styles, including modern options, this guide to home blinds and shades is a helpful reference.
Pair the remote and set limits
Most motorized blinds need three basic steps. Wake the motor, pair the remote, then set the upper and lower stopping points.
If the blind travels too far up, the fabric can jam into the cassette or roll too tight. If it stops too high at the bottom, you'll stare at a light gap every day. That's why limit setting matters more than the pairing itself.
A simple setup routine looks like this:
- Power the shade: Confirm the motor responds before pairing.
- Sync the remote: Follow the product instructions for your exact model.
- Test direction: Make sure up goes up and down goes down.
- Set the top limit: Stop the shade where you want the fully open position.
- Set the bottom limit: Stop it where you want full coverage.
Smart app setup without the headache
Once the remote works, app control is usually optional. If you're connecting the shade to a smart home platform, do it after you've confirmed manual remote control works consistently.
Keep your expectations practical. Smart features are great for schedules and convenience, but the blind still needs a clean physical install and properly set travel limits first.
If the app sees the shade but commands don't behave the way you expect, recheck the limit settings before assuming the tech is faulty. A lot of “smart blind problems” are really setup problems.
Troubleshooting Common Installation Hiccups
Most blind issues come from one of three places. The brackets aren't level, the opening isn't as square as it looked, or the mount choice was wrong for the window.
The good news is that many of these problems are fixable without starting from scratch.
If the blind hangs crooked
Start with the brackets. One bracket can be slightly higher, slightly deeper, or slightly twisted, and that's enough to throw the whole headrail off.
Try this short checklist:
- Recheck level: Put the level across both brackets, not just the top trim.
- Loosen and adjust: A small bracket shift can straighten the blind fast.
- Inspect the surface: Uneven casing can tilt a bracket even when your marks looked fine.
- Use a shim if needed: On older trim, a thin shim behind one bracket can correct the angle.
If it rubs or binds during operation
Binding usually means the blind is too tight to one side, the brackets are pinching the headrail, or the opening narrows somewhere you didn't expect. Don't ignore it and hope it wears in. It won't.
Remove the blind and dry-fit the headrail again. Look at the spacing on both sides and check whether the frame is tapering. If the opening is fighting the blind, an outside mount may have been the better choice from the start.
Some of the hardest installs aren't hard because of the blind. They're hard because the window opening lies to you until the hardware is up.
Older windows need judgment not just instructions
This is the gap in most how-to content. Many guides don't really address out-of-square or angled windows, even though that's exactly where homeowners get stuck. As noted in this installation resource from Blinds.com, the central judgment call involves whether to use shims, switch to an outside mount, or bring in a professional for a tricky opening.
That matters a lot in older homes. If the top width is different from the bottom width and the sides aren't plumb, the blind can fit on paper and still operate poorly in real life.
A practical way to decide:
- Use shims if the frame is close and one bracket just needs minor correction.
- Choose outside mount if the recess is visibly crooked, shallow, or crowded by trim and hardware.
- Call a pro for angled tops, historic trim you don't want to damage, or openings that need custom fabrication.
If you have one of those older Ontario windows that looks square from across the room but not from two feet away, trust the tape measure over your eyes.
When to Call a Certified Installer
Some jobs stop being good DIY candidates once the window gets large, high, irregular, or expensive enough that mistakes hurt. That isn't failure. That's good judgment.
Specialty shapes are the obvious example. Angled tops, arches, extra-wide openings, and motorized blinds that need a very clean finish all raise the stakes. So do old plaster walls, brittle trim, and recessed windows that leave almost no room for error.
There's also a service reason to hire out. In some markets, the custom blind business has moved toward a consultative, made-to-measure installation model where the team handles design input, precise measurement, product selection, and final installation, as described in this California commercial blinds service model from Stoneside. The bigger point applies anywhere. With custom blinds, the installer's expertise can be just as important as the blind itself.
If the opening is odd, the product is premium, or you're already second-guessing the mount choice, paying for expert measurement and installation often protects the investment better than pushing through a stressful DIY job.
If you're in the London, Ontario area and want a clean, worry-free result, Blinds Hut can help with consultation, precise measurement, and certified installation for custom blinds, shades, shutters, and motorized options. It's a practical way to get difficult windows handled properly the first time.
Powered by the Outrank tool